

What if the most stressful part of your home renovation wasn’t the cost, but the uncertainty of what’s hiding beneath your old shingles? It’s natural to feel a sense of dread when you think about crews tearing into your home’s primary defense system. You might worry about hidden structural rot or accidental damage to your landscaping during the tear-off phase. Understanding the roof replacement process from start to finish is the best way to replace that anxiety with quiet confidence. We know that your home is your most significant priority, and you deserve a protective partner who values transparency as much as craftsmanship.
You’re likely looking for a leak-free result that stands up to the unpredictable Massachusetts weather without the headache of a messy job site. This guide simplifies the technical complexities of material layers and local building codes into a clear, logical roadmap. We’ll walk through every step, from the initial site preparation and permit acquisition to the final magnetic sweep of your property. By the end of this article, you’ll have the expert knowledge needed to oversee your project with total security, ensuring your home remains the safe haven it’s meant to be.
Key Takeaways
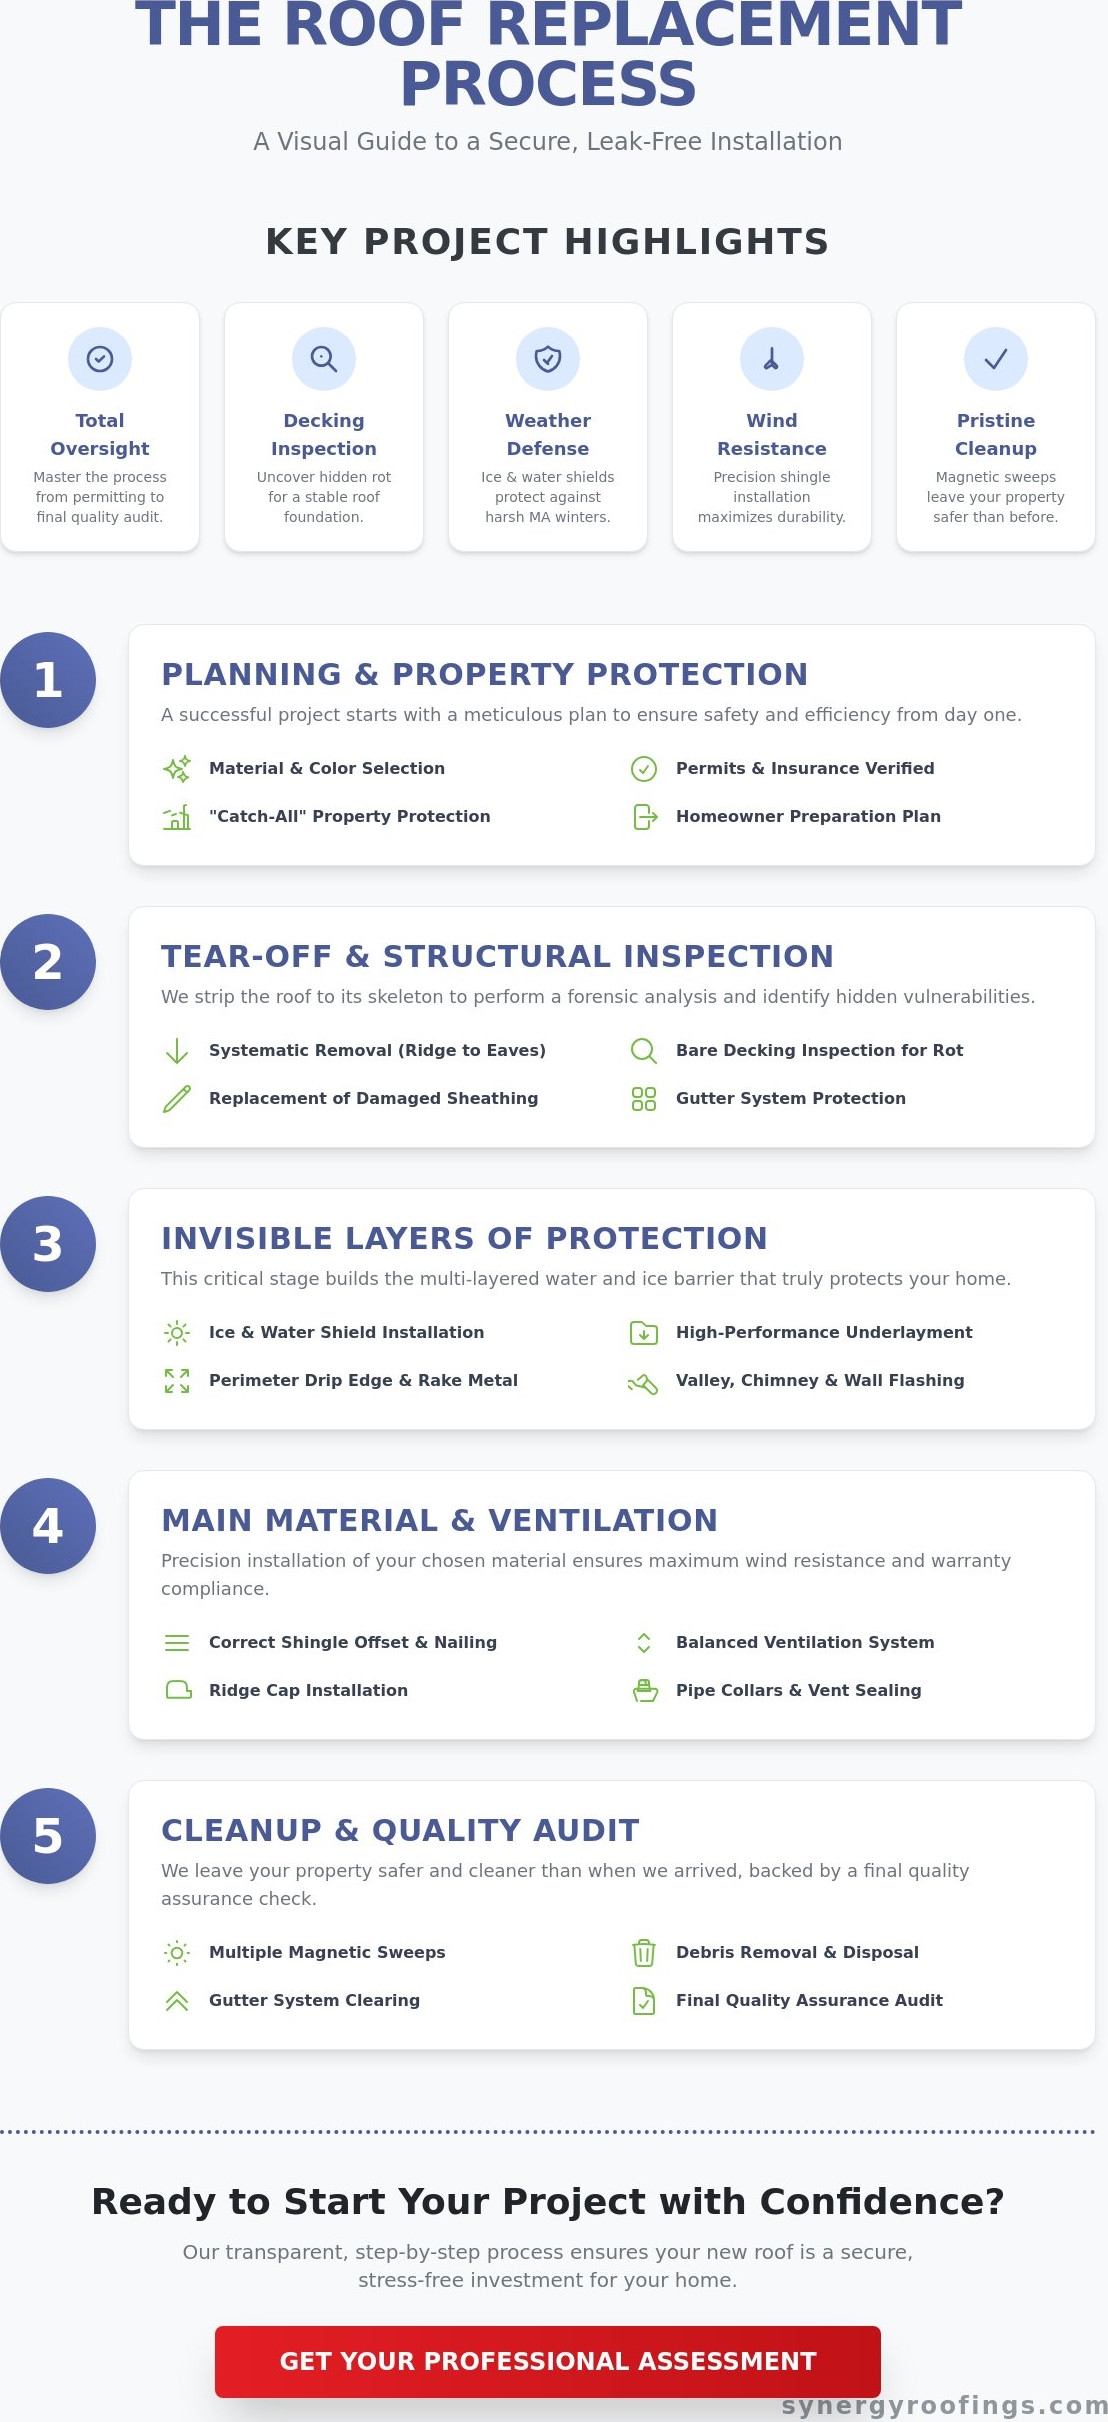
- Gain total oversight of your project by mastering the roof replacement process from start to finish, from local Medway permitting to the final quality audit.
- Learn why a thorough structural decking inspection is the only way to uncover hidden rot and ensure a stable foundation for your new roof.
- Understand the critical role of ice and water shields in protecting your home against harsh Massachusetts winter snow loads and ice dams.
- Discover how precision installation techniques, like the correct shingle offset, maximize wind resistance and protect your long-term manufacturer warranty.
- See how a professional cleanup process, featuring multiple magnetic sweeps and gutter clearing, leaves your property safer and cleaner than when the project began.
Phase 1: Pre-Construction Planning and Property Protection
A successful roof replacement doesn’t begin with a hammer; it begins with a meticulous plan. Mastering the roof replacement process from start to finish requires looking beyond the shingles to the logistics that keep your property safe. We start by finalizing your material choices, whether you’ve selected the classic look of asphalt shingle roofing, the durability of a metal roof, or the specialized performance of rubber roofing for low-pitch areas. To explore modern options like solar-integrated shingles, check out Rainier Roofing LLC as a resource for advanced roofing technology. Selecting the right color palette is about more than just curb appeal. It’s about ensuring your home feels renewed and secure for decades to come.
Before a single shingle is moved, we establish a “Catch-All” system. This isn’t just a tarp on the grass. It’s a specialized netting and shielding strategy designed to protect your delicate landscaping, siding, and windows from falling debris. We also identify precise zones for material delivery and dumpster placement to minimize impact on your daily routine. Understanding the structural components of a Roof helps us determine where weight can be safely distributed during this staging phase so your driveway and yard remain undamaged.
To better understand how these initial steps prepare your home for a successful installation, watch this helpful video:
The Administrative Checklist
Paperwork is the foundation of a legal and safe installation. In Medway and surrounding Massachusetts municipalities, securing the correct building permits is mandatory. We handle this bureaucracy for you, ensuring every local code is met from day one. You should always verify that your contractor carries active workers’ compensation and liability insurance specifically for the MA region—to see a model of how professional contractors present their credentials and services, check out United Roofing & More!. We’ll also establish a clear communication protocol with your dedicated project manager. This ensures you’re always informed about weather contingencies or shifts in the project timeline, providing the psychological relief that comes with total transparency.
Staging Your Home for Success
You play a vital role in this collaborative relationship. We ask that you clear the driveway to make room for heavy equipment and material trailers. Inside the home, it’s wise to remove fragile items from walls or shelves. While we work with precision, the vibrations from removing an old roof can occasionally jostle interior decor. Don’t forget to move patio furniture or grills away from the house perimeter. Finally, please ensure that outdoor pets and children are kept safely away from the work zone during active hours. This simple preparation helps us maintain a secure environment for your family and our crew.
Phase 2: The Tear-Off and Structural Decking Inspection
Once the staging is complete, the physical transformation of your home begins. Our crews work with precision, systematically removing the old shingles starting from the ridge and working down toward the eaves. This methodical approach isn’t just about speed. It’s about maintaining a controlled flow of debris and ensuring your property remains organized. By stripping the system down to the bare wood, we reveal the true condition of your home’s skeleton. This is a pivotal moment in the roof replacement process from start to finish because it’s the only way to identify hidden vulnerabilities that a simple shingle-over would ignore.
You might feel a surge of anxiety when the “bones” of your roof are exposed, but this step is where we provide the most value as your protective partner. We aren’t just removing trash; we’re performing a forensic analysis of your home’s performance over the last two decades. If you suspect your current system is already failing, reaching out for a professional assessment at synergyroofings.com can help you plan for these structural needs before they become emergencies.
Removing the Old System
During the tear-off, we place a high priority on protecting your gutters. We use specialized stand-offs and bracing to ensure they don’t bend or detach under the weight of ladders or falling material. As the old layers come off, our experts look for signs of chronic moisture intrusion. These signs often point to areas where previous flashing failed or where the original design lacked proper drainage. Identifying these spots early allows us to apply our specialized roof leak repair skills during the reconstruction, ensuring the new system won’t suffer from the same legacy issues.
The Decking Inspection
The roof deck is the foundation of your entire protection system. We inspect every square inch of the plywood or OSB for “soft spots,” delamination, or active rot. If we find “bad wood,” we don’t just cover it up. We replace damaged sheets to ensure the surface is perfectly flat and structurally sound. We also verify that the deck is properly nailed to the rafters, which is a critical step for meeting modern wind resistance standards. This thoroughness ensures that your new underlayment has a smooth, stable surface to bond with, creating a seamless barrier against the elements. While finding rot can be stressful, it’s far better to address it now than to have a structural failure three years into your new roof’s life.
Phase 3: Installing the Invisible Layers of Protection
Once your roof deck is clean and structural repairs are finished, we begin the most critical part of the roof replacement process from start to finish: installing the secondary barriers. While shingles or metal panels provide the aesthetic finish, these invisible layers do the heavy lifting when it comes to waterproofing. We start by installing a heavy-gauge drip edge along the eaves. This metal flashing directs water away from your fascia boards and straight into your gutters, preventing the wood rot that often plagues Massachusetts homes after a long rainy season. We then roll out high-performance synthetic underlayment across the entire deck. Unlike traditional felt paper, which can tear or degrade, synthetic materials offer superior durability and a secondary line of defense if a shingle is ever damaged by wind.
In our local climate, standard protection isn’t enough. We prioritize specialized barriers that account for the heavy snow loads and ice dams common in Medway and the surrounding areas. This phase is about creating a watertight seal that gives you psychological relief every time a winter storm rolls in. By the time we’re ready for the top layer, your home is already shielded from the elements.
Critical Waterproofing Components
Ice and water shield is a non-negotiable component for any professional installation in New England. We apply this self-adhering membrane at least six feet up from the eaves and in every valley. This prevents water from backing up under the shingles when ice dams form. We also install starter shingles along the perimeter. These specialized strips provide the necessary adhesive bond to keep the first course of shingles from lifting during high winds. Protecting these vulnerable transitions ensures your home remains a safe haven regardless of the forecast.
Flashing and Specialized Vents
A leak-free roof depends on the precision of its transitions. We replace old, worn-out chimney flashing with new lead or copper to ensure a permanent seal. If your project includes a Velux skylight installation or sun tunnels, we integrate specialized flashing kits at this stage to prevent moisture intrusion around the glass. We also verify that all plumbing boots and attic vents are properly seated and sealed. This meticulous attention to detail is vital whether you are installing asphalt shingles or setting the stage for a metal roofing Massachusetts system. Every penetration in the roof must be treated as a potential vulnerability that requires a high-quality, professional solution.
Phase 4: Main Material Installation and Ventilation
With the protective underlayment securely in place, your home is ready for its primary shield. This phase of the roof replacement process from start to finish is where your aesthetic vision becomes a functional reality. Whether you have chosen the versatile look of asphalt shingle roofing or the sleek profile of metal, the installation must be executed with surgical precision. We maintain a strict “offset” pattern during shingle application. This staggered layout ensures that water flows over the seams rather than through them, providing maximum wind resistance and keeping your manufacturer warranty fully intact.
As the main field of the roof is completed, we turn our focus to the ridges and hips. We use specialized capping shingles that are thicker and more durable than standard field shingles. These provide a finished, professional look while reinforcing the areas of your roof that face the most stress from wind and rain. This is also the stage where we integrate any skylight replacements, ensuring the new units are perfectly nested within the material courses for a seamless, leak-proof fit. If you’re ready to secure your home with a system designed for longevity, schedule your professional assessment today.
Shingle Installation Mastery
Precision is our standard. In Norfolk County, our crews utilize a specific 6-nail pattern for every shingle. This exceeds standard requirements and provides the extra security needed for our coastal-influenced storms. We use chalk lines to ensure every course is perfectly straight. This isn’t just for curb appeal; straight lines ensure proper water shedding and prevent pooling. For homes with low-pitch sections, we expertly transition to specialty materials like SBS rubber or single-ply membranes, ensuring every angle of your home receives the specific protection it requires.
The Ventilation Balance
A roof is a living system that must breathe. We install a continuous ridge vent system along the peaks to allow hot, moist air to escape your attic naturally. This exhaust must be perfectly balanced with intake air from your soffits. Without this equilibrium, heat builds up in the summer, baking your shingles from the inside out and shortening their lifespan. In the winter, proper airflow is your best defense against ice dams. We personally verify that your attic insulation hasn’t blocked the airflow path, ensuring your new roof performs as a high-efficiency thermal barrier for your entire home. This scientific approach to ventilation provides the long-term reliability you expect from a professional partner.
Phase 5: Final Cleanup and Quality Assurance Audit
The physical installation might be complete, but the final phase of the roof replacement process from start to finish is where we solidify your home’s protection. We treat the conclusion of a project with the same urgency as the beginning. Our team performs a rigorous 50-point quality assurance audit. We examine every flashing detail, plumbing boot, and shingle course to ensure they meet our high standards and your specific expectations. This isn’t a cursory glance; it’s a deep dive into the technical integrity of the system to guarantee it meets local Massachusetts weather standards.
Once our internal audit is finished, we invite you for a final walkthrough. This is your opportunity to ask questions and see the results of our collaborative relationship up close. We want you to feel a sense of quiet confidence as you look at your renewed property. We’ll point out the specific improvements made, such as the new ridge ventilation or the chimney flashing mentioned in previous phases, so you know exactly how your home is being protected. We don’t consider the job done until you feel 100% satisfied with the outcome.
The Synergy “No-Trace” Cleanup
We believe a professional job site should look better when we leave than when we arrived. Our “No-Trace” protocol begins with clearing all debris from the roof surface and blowing out the gutters. We pay special attention to the granules and small shingle scraps that naturally fall during installation. The most critical tool in this phase is the heavy-duty magnetic sweep. We roll the magnet over your driveway, lawn, and walkways multiple times to capture every stray nail. We then restore your landscaping, outdoor furniture, and decorations to their original positions, ensuring your daily life returns to normal without delay. All equipment, trailers, and the dumpster are removed promptly to leave your property pristine.
Project Closeout and Warranties
The administrative side of your project concludes with the final permit sign-off from your local municipality. We handle the registration of your manufacturer warranty, ensuring your investment is documented and secure. It’s important to understand that your protection comes from two distinct sources. The material warranty covers the shingles themselves, while our workmanship warranty covers the precision of the installation. We’ll explain the specifics of each so you know exactly what’s covered for the long term. If you’re ready for a protective partner who values honesty and community, consult the top roofing companies in MA to see how we compare.
Secure Your Investment with a Protective Partner
Replacing a roof is a significant undertaking, but it doesn’t have to be a source of stress. You now understand that a high-quality result depends on more than just new shingles. It requires a meticulous focus on the invisible layers of protection, like ice and water shields, and a scientific approach to attic ventilation. By mastering the roof replacement process from start to finish, you can oversee your project with the quiet confidence that your home meets the highest standards of safety and durability.
We’ve been serving Medway and the broader Massachusetts community since 2000 as expert asphalt, metal, and rubber roofing installers. As Velux Skylight Specialists, we take pride in managing every technical detail so you don’t have to. Your home is your most valuable property, and it deserves a guardian that values honesty and community. When you’re ready to move forward with a team that treats your priorities as our own, we’re here to help. Request Your Free Roof Replacement Estimate from Synergy Roofing and take the first step toward a safer, leak-free home today. We look forward to building a lasting relationship with you.
Frequently Asked Questions
How long does a typical roof replacement process take?
Most residential projects take one to three days depending on the size and complexity of your home. A standard 2,000 square foot home often wraps up in just 48 hours once the tear-off begins. While weather conditions or structural repairs can extend this timeline, we prioritize efficiency to minimize disruption. This ensures every layer is installed to our high professional standards without dragging the project out unnecessarily.
Do I need to be home while the roof is being replaced?
You don’t need to be home while our crews are working on your property. Since the work happens on the exterior, we only require access to an outdoor power outlet and a clear driveway for our equipment. Many homeowners prefer to be away during the day to avoid the noise. We’ll maintain a clear communication bridge with you through your project manager to provide updates throughout the day.
Will a new roof make a lot of noise inside the house?
Yes, the roof replacement process from start to finish is inherently loud due to heavy equipment and constant hammering. You’ll hear shingles being stripped, new materials being nailed down, and crews moving across the deck. If you work from home or have sensitive pets, we recommend planning to be out of the house during active work hours. This ensures your day remains productive while we focus on the installation.
What happens if it rains during the roof replacement process?
We monitor local weather forecasts with precision and only open sections of your roof that we can seal before a storm hits. If unexpected rain occurs, our crews are trained to quickly secure any exposed area with heavy-duty, waterproof tarps. We never leave your home’s interior vulnerable to the elements. This proactive approach is part of our commitment to being a protective partner for your most valuable asset.
How do I know if my roof decking needs to be replaced?
Our team identifies damaged decking by looking for soft spots, water stains, or active rot once the old shingles are removed. You might notice sagging from the ground, but a full strip-down is the only way to verify structural integrity. If we find “bad wood,” we replace the plywood sheets immediately. This ensures your new roof has a flat, stable foundation that meets modern Massachusetts building codes for wind resistance.
Is it necessary to replace my gutters at the same time as my roof?
It isn’t strictly necessary to replace your gutters, but it’s often the most logical time to do so. Installing new gutters during a roof replacement ensures the drip edge and shingles integrate perfectly with the drainage system. This prevents water from backing up into your fascia boards. If your current gutters are over 15 years old or showing signs of sagging, replacing them now provides a complete, high-quality solution.
What is the most important step in the roofing process for MA weather?
Installing a high-quality ice and water shield is the most critical step for Massachusetts homes. This self-adhering barrier prevents leaks caused by ice dams during our harsh winters. We apply this membrane at least six feet up from the eaves and in all valleys. This creates a watertight seal that protects your home’s interior even when snow and ice accumulate on the roof for weeks at a time.
Can I stay in my house during the installation?
You can stay inside your home, but please be prepared for significant noise and vibrations. The constant hammering and movement can be disruptive for young children or those who work from home. If you stay, we ask that you remain inside for your safety. Falling debris is a risk near the perimeter of the house, so staying indoors ensures you and your family are protected from the work zone.