
Most homeowners think they have a simple carpentry problem when they see crumbling trim, but rotted wood around your chimney is almost always a roofing failure in disguise. It’s incredibly frustrating to see wood deteriorating even when it’s been freshly painted, and the anxiety of potential structural damage can keep you up at night. You want a home that stays dry and secure without the constant fear of hidden water intrusion or escalating repair needs. We understand that your property is your most significant priority, and seeing it compromised by moisture is stressful.
In this guide, we’ll show you exactly how to repair rotted wood around chimney structures by identifying the root cause, removing the decay, and fixing the underlying flashing issues that let moisture in. We’ll walk you through the step-by-step process for a professional-grade restoration and help you understand how to stop the rot from returning. You’ll gain a clear roadmap for renewal and the knowledge to determine if a specific fix is a safe DIY project or if it’s time to bring in a professional partner to safeguard your home’s long-term integrity.
Key Takeaways
- Identify the subtle visual cues of fungal decay, such as wood “alligatoring” and staining, to catch moisture damage before it reaches your home’s structural framing.
- Learn how to repair rotted wood around chimney structures by focusing on the “Water Shed” principle to ensure your new trim doesn’t fail within two seasons.
- Master a safe, step-by-step removal process that protects your existing shingles while replacing compromised wood with high-quality, durable materials.
- Establish a long-term defense for your property by following the “5-year rule” for proactive maintenance and annual flashing inspections.
- Use the “Three-Story” rule to accurately assess the difficulty of your project and recognize when structural rot requires a professional partner’s expertise.
Identifying the Severity of Rotted Wood Around Your Chimney
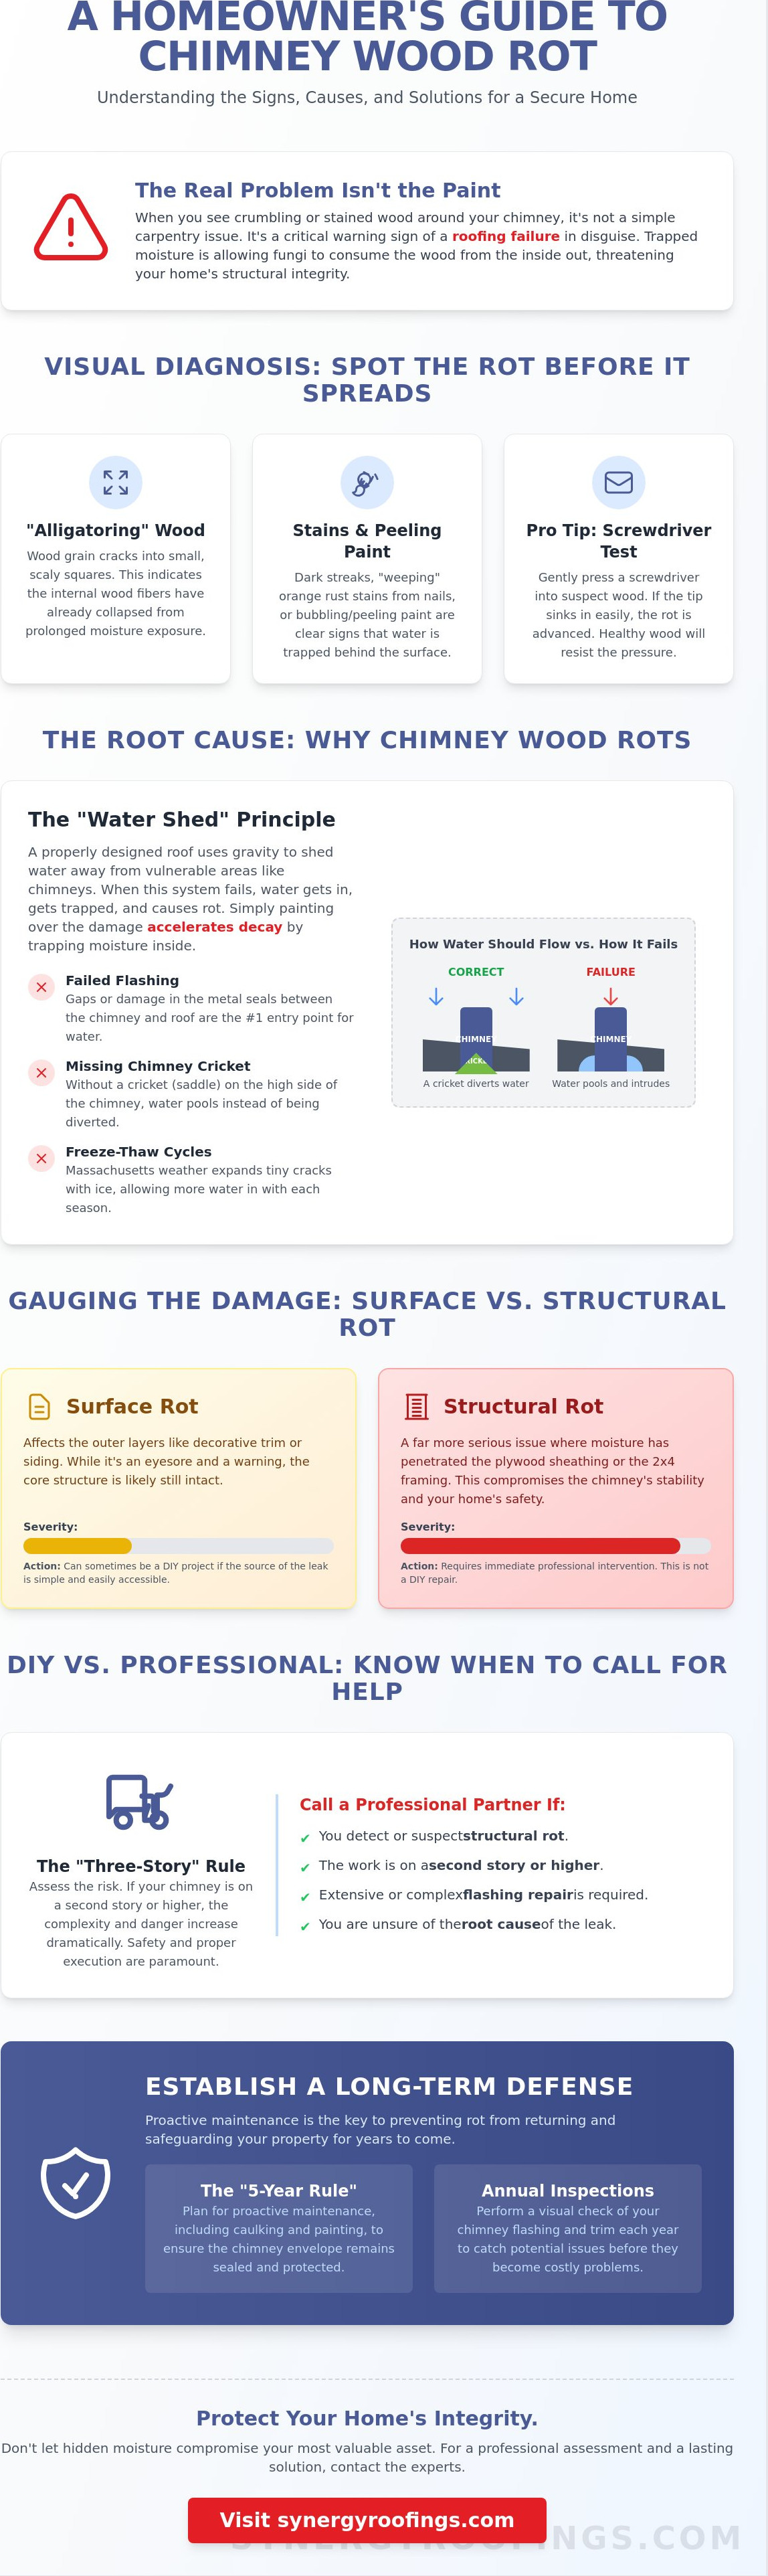
Chimney wood rot isn’t just a cosmetic flaw; it’s a biological process where fungi consume the wood fibers. This happens when moisture gets trapped behind your siding or trim for extended periods. Understanding what dry rot is can help you realize that paint alone won’t stop the spread once the fungi take hold. When moisture is locked in, the wood begins to soften and lose its structural integrity, eventually leading to a failure of the entire chimney envelope.
Visual cues are your first line of defense. Look for peeling paint, dark staining, or “alligatoring,” which is when the wood grain cracks into small, scaly squares. These scaly patterns indicate that the wood’s internal structure has already collapsed. If you see these signs, you need to learn how to repair rotted wood around chimney areas before the damage migrates to your home’s skeleton. Ignoring these early warnings often leads to much higher costs and more invasive repairs later on.
To see how these issues look in a real-world scenario, watch this professional inspection:
You can assess the damage yourself with a simple screwdriver test. Gently press the tip of a flathead screwdriver into any discolored or suspect wood. If the tip sinks in easily like it’s hitting soft butter, the rot is advanced. Solid wood should resist the pressure entirely. This test helps you determine if you’re dealing with a minor surface issue or a deep-seated problem that requires immediate professional intervention.
It’s vital to distinguish between surface rot and structural rot. Surface rot typically affects the decorative trim or the outermost layer of siding. While it looks bad, it’s often a straightforward replacement. Structural rot is far more serious; it means the moisture has reached the plywood sheathing or the 2×4 framing studs beneath. If the framing is soft, the chimney’s stability is at risk, and you’ll need a more comprehensive solution from a partner like Synergy Roofing to ensure your home stays protected.
Signs of Hidden Damage Behind the Siding
Sometimes the worst damage is hidden from plain sight. You should watch for rusted nail heads or “weeping” orange stains on the chimney stack, which suggest water is sitting behind the boards. Check for soft spots or bubbling on interior drywall directly below the roofline. You should also identify gaps in the caulking where the wood meets the masonry; these small openings are often the primary entry points for destructive moisture.
The Role of Massachusetts Weather in Wood Decay
Massachusetts weather is notoriously hard on external wood. In Medway and across Norfolk County, the freeze-thaw cycle is a major culprit. When water enters a small crack and freezes, it expands, widening the gap for the next rainstorm. Snow accumulation against chimney siding during our long winters provides a constant source of moisture that paint can’t always repel. Shaded chimneys are at even higher risk because they lack the sunlight needed to evaporate dampness, leading to persistent moisture and rapid algae growth.
The Root Cause: Why Chimney Wood Rots
Gravity is a relentless force that governs every aspect of your roof’s performance. When we discuss the “Water Shed” principle, we’re referring to a design that ensures water always flows down and away from vulnerable joints. If your chimney’s design or maintenance fails to respect this principle, gravity will eventually pull moisture into the wood. Many homeowners attempt to solve the problem by simply painting over the soft spots. This is a dangerous shortcut because paint creates a non-breathable barrier that traps moisture inside the wood fibers, effectively accelerating the decay.
Understanding the source of the leak is the most critical step in learning how to repair rotted wood around chimney structures. One often overlooked hero of moisture management is the chimney cricket, also known as a saddle. This small, peaked structure sits on the high side of the chimney on steeper roofs to divert water around the masonry. Without a properly installed cricket, water pools against the back of the chimney, putting immense pressure on the seals and leading to inevitable rot.
When researching the best methods for repairing rotted wood, you’ll find that addressing the entry point is just as important as replacing the boards. Most failures occur at specific transition points like aged caulking, loose counter-flashing, or missing kick-out flashing. These components are designed to work together to keep the interior dry. If any single piece of this puzzle fails, the wood trim becomes the primary target for water damage.
Chimney Flashing Failures 101
A reliable flashing system consists of three parts: base flashing, step flashing, and counter-flashing. These metal components must overlap perfectly to shed water effectively. Over time, thermal expansion causes these different materials to expand and contract at varying rates, which eventually pulls the metal away from the brick or siding. Once a gap forms, capillary action is the physical phenomenon where water is drawn upward into narrow spaces between materials, effectively defying gravity to reach the wood behind your trim.
Inadequate Drainage and Gutter Issues
Your gutters play a vital role in protecting your chimney’s wood siding. When gutters are clogged with debris, water backs up and spills over onto the chimney eaves, saturating the wood. A proper drip edge is also necessary to lead water away from the bottom of the siding boards. If you suspect your home’s drainage is compromised, a professional gutter installation can provide the high-quality protection your property needs to stay dry. Addressing these drainage issues now is the best way to ensure your future repairs last for decades.
Step-by-Step Guide to Repairing Chimney Wood Rot
Safety is our first priority. Before you even touch a pry bar, you need to secure your environment. Working at height requires a professional-grade roof harness and stable, properly angled ladders. Always scan for overhead power lines before extending your equipment. If the pitch of your roof is steep or the chimney is multi-story, the risk increases significantly. This is why many homeowners choose to partner with a professional rather than attempting a solo repair.
Learning how to repair rotted wood around chimney structures begins with a surgical removal process. You must carefully pry back the damaged trim to avoid tearing the underlying asphalt shingles. Use an oscillating multi-tool to make clean cuts in the wood without vibrating the entire chimney stack. Once the wood is gone, you can see the true extent of the decay. For a deeper understanding of fungal spread, resources like Wood Rot 101: Prevent and Repair offer excellent guidance on identifying the point where wood is no longer salvageable.
Treatment is the next essential phase. Once you’ve removed the visible rot, apply a borate solution or wood hardener to the remaining healthy wood. This step kills any lingering fungal spores and strengthens the wood fibers against future attacks. It’s a critical bridge between demolition and restoration that ensures your new materials aren’t being installed over a ticking time bomb of decay.
Tools and Materials You Will Need
You’ll need an oscillating multi-tool, a flat pry bar, stainless steel fasteners, and high-quality flashing tape. While cedar was once the standard, we often recommend PVC trim for Massachusetts homes because it’s impervious to moisture and insects. Regardless of the material, you must install a secondary water barrier. A layer of house wrap or synthetic underlayment behind the new trim acts as a final fail-safe against the elements. If you’re unsure about the best materials for your specific roofline, Synergy Roofing can guide you through the selection process.
Detailed Step-by-Step Execution
- Step 1: Remove all rotted boards and inspect the house wrap and sheathing underneath. If the wrap is torn, it must be replaced to prevent future leaks.
- Step 2: Replace any soft or crumbling sheathing. Ensure the new plywood is flush with the chimney masonry to provide a flat surface for your trim.
- Step 3: Install new flashing or repair existing sections using a professional-grade sealant. This step is where most DIY projects fail; the metal must be perfectly integrated into the siding.
- Step 4: If you’re using wood, prime all six sides of your new boards before installation. This “back-priming” prevents the wood from wicking moisture from the rear. Finish the job with a high-grade exterior caulk at every joint.
Essential Preventative Maintenance for Chimneys
Maintaining your home’s integrity requires more than just knowing how to repair rotted wood around chimney structures; it requires a strategy to prevent that rot from ever starting. We recommend a proactive approach through annual inspections during your spring and autumn roof walks. During these sessions, you should look for minor separations in joints or hairline cracks in the sealant. Catching these small issues early prevents the fungal decay we discussed earlier from taking root in your trim and spreading to the sheathing.
One of our steadfast recommendations is the “5-year rule.” Even if the sealant looks intact from the ground, you should proactively strip and replace old chimney caulking every five years. The intense solar heat and winter cold in Norfolk County cause standard sealants to lose their elasticity over time. This loss of flexibility creates microscopic pathways for water to enter. By replacing the caulk before it fails, you maintain a continuous water-tight seal that protects your investment.
Managing nearby vegetation is another simple yet effective tactic for homeowners. Overhanging branches drop debris that traps moisture against the wood siding and provides a shaded environment where algae and fungi thrive. This lack of airflow prevents the wood from drying out after a storm. If you notice persistent dampness or staining, a professional roof leak repair inspection can identify hidden vulnerabilities before they become expensive structural failures.
The Importance of Proper Chimney Flashing
You should regularly check for “lifting” flashing, where the metal has pulled away from the masonry. Many DIYers reach for “roof cement” to patch these gaps, but this is a temporary fix that eventually cracks and traps moisture against the wood. Lead or copper flashing is the gold standard for Massachusetts homes because these materials withstand our extreme temperature fluctuations without losing their shape or rusting. Identifying a flashing gap early is the best way to avoid a full-scale project on how to repair rotted wood around chimney areas.
Seasonal Checklist for Medway Homeowners
Living in Medway means dealing with heavy winter precipitation and rapid temperature shifts. Your seasonal checklist should include specific actions to protect your chimney’s exterior. We suggest focusing on these three areas:
- Clear heavy snow from the chimney base promptly to prevent ice damming and moisture seepage.
- Check masonry for new cracks that allow water to bypass your siding and reach the interior framing.
- Ensure the chimney cap is secure to keep water from pouring down the flue or splashing back onto the wood trim.
Consistent care is the only way to safeguard your property from the elements and ensure long-term peace of mind. If you are concerned about the current state of your chimney seals or see signs of moisture, contact Synergy Roofing for a comprehensive evaluation and high-quality maintenance plan.
Professional Restoration vs. DIY: When to Call Synergy Roofing
Deciding whether to take on a home project yourself or hire a professional is often a matter of safety and technical complexity. We utilize the “Three-Story” rule to help homeowners make this choice. If your chimney rises more than two stories or sits on a high-pitch roof, the specialized safety equipment and risk management required make it a job for experts. While you may now understand the fundamentals of how to repair rotted wood around chimney structures, executing that repair 30 feet in the air requires a level of precision that is difficult to achieve without professional training.
Another critical turning point is the discovery of structural rot. If your initial inspection reveals that the 2×4 framing studs or the plywood sheathing are soft and crumbling, you are no longer looking at a simple trim replacement. Structural restoration requires temporary support and precise carpentry to ensure the chimney remains stable and plumb. When the skeleton of the chimney is compromised, the project moves beyond a DIY fix and requires the intervention of a protective partner who understands the physics of roof loads.
Professional installation provides a level of security that standard DIY methods cannot match. When we handle complex chimney flashing and wood restoration, we don’t just rely on a bead of caulk to keep the water out. We provide a Flashing Guarantee, ensuring that the metalwork is mechanically integrated into your roof system. This creates a permanent, high-quality barrier that stands up to the harshest Massachusetts storms, giving you the quiet confidence that your most valuable property is secure.
Why a “Quick Fix” Often Costs More Later
A common mistake is focusing only on the exterior appearance of the chimney. If the wood rot has allowed moisture to seep into the attic space, you may face hidden mold growth that compromises your family’s indoor air quality. Additionally, improper repairs that involve cutting into or overlapping existing shingles can unintentionally void your shingle manufacturer’s warranty. A professional repair from a trusted peer comes with a comprehensive warranty on both labor and materials, ensuring you don’t pay for the same repair twice.
Your Protective Partner in Medway
We take a holistic view of your home’s environmental health. In Medway and throughout Norfolk County, a chimney is a complex intersection of masonry, metalwork, and wood siding that requires a steady, logical approach to maintain. We invite you to request a comprehensive roof and chimney inspection to ensure every component of your home’s exterior is functioning as intended. Our goal is to lead you from a state of concern about moisture damage to a state of complete resolution. Protect your home from rot—Contact Synergy Roofing for a professional chimney inspection today.
Secure Your Home Against Future Moisture Damage
Addressing chimney rot requires a dual focus on carpentry and roofing logic. You’ve learned how to identify the early warning signs of fungal decay and why simply painting over the problem only accelerates the damage. The real secret to a long-lasting repair lies in the “Water Shed” principle and the integrity of your flashing system. By addressing these root causes, you move from a cycle of constant patching to a state of permanent home protection.
Knowing how to repair rotted wood around chimney areas gives you the power to act, but you don’t have to face these high-altitude challenges alone. As local Medway experts serving Norfolk County, we specialize in chimney flashing and leak repair. Whether you need a Velux Certified Specialist or a comprehensive assessment of your masonry, we’re here as your protective partner. Take the first step toward a dry, structurally sound home today.
Schedule a Professional Chimney & Roof Inspection with Synergy Roofing to safeguard your property. We look forward to helping you achieve total peace of mind for your home’s future.
Frequently Asked Questions
Can I just paint over rotted wood around my chimney?
No, you should never paint over rotted wood because it traps moisture and accelerates fungal growth. Paint creates a non-breathable seal that hides the decay while the fungi continue to eat the wood fibers from the inside out. To learn how to repair rotted wood around chimney structures effectively, you must remove the damaged material entirely. Simply covering it up leads to more expensive structural repairs within a year or two.
How much does it cost to repair rotted wood on a chimney in Massachusetts?
General industry data suggests that minor wood rot repairs can cost between $100 and $500, while extensive structural replacement often ranges from $2,500 to $5,000. These costs vary based on the height of the chimney and the extent of the moisture penetration. In Massachusetts, labor rates and material choices like PVC also influence the final investment. You should check with your local building department, as structural repairs often require a permit.
What is the best type of wood to use for chimney trim?
PVC trim is the superior choice for Massachusetts chimneys because it’s impervious to moisture and the freeze-thaw cycle. While cedar and redwood are naturally rot-resistant, they still require consistent staining or painting to survive Norfolk County winters. If you choose wood, ensure it’s back-primed on all six sides before installation. This prevents the boards from wicking moisture from the rear, which is a common cause of premature failure.
How do I know if my chimney flashing is leaking or if the wood is just old?
You can distinguish between the two by performing a screwdriver test at the joints where wood meets the masonry. If the wood is soft only near the flashing or at the base, water is likely bypassing your seals. Old wood that isn’t rotted will appear gray, weathered, or brittle, but it will still feel solid when probed. Flashing leaks typically cause localized scaly patterns or dark staining that indicates active moisture intrusion.
Is wood rot around a chimney covered by homeowners insurance?
Most homeowners insurance policies don’t cover wood rot because it’s classified as a maintenance issue rather than sudden, accidental damage. Insurance typically pays for repairs caused by a specific event, like a fallen tree or a lightning strike. Since rot develops gradually over months or years, the responsibility for repair falls on the homeowner. Maintaining your chimney flashing is the best way to avoid these out-of-pocket expenses.
How long does a typical chimney wood rot repair take?
A standard repair involving trim and minor flashing adjustments typically takes one to two days to complete. If the inspection reveals structural rot in the sheathing or framing, the timeline may extend to three or four days. Factors like roof pitch, chimney height, and weather conditions in Medway also play a role in the project duration. We prioritize a steady, logical workflow to ensure every layer is perfectly sealed before we finish.
Can I use wood filler or epoxy to fix chimney rot?
You can use epoxy-based wood hardeners and fillers for minor cosmetic damage, but they aren’t a substitute for replacing structural wood. These products work by penetrating the wood fibers to strengthen the damaged area and provide a water-resistant seal. However, if the rot has compromised the integrity of the board or the framing beneath, removal and replacement is the only high-quality solution. Epoxy is best used for small holes or decorative trim.
What is a chimney cricket and do I need one to prevent rot?
A chimney cricket is a peaked, tent-like structure built on the high side of a chimney to divert water and debris. You definitely need one if your chimney is wider than 30 inches or sits on a steep slope. Without a cricket, water pools behind the chimney, putting constant pressure on the flashing. This pooling is a primary cause of wood rot, so installing a cricket is an essential preventative measure for long-term protection.